
Although I’m not the type who believes you have to learn to write kanji by hand (who writes by hand nowadays?) there are plenty of people out there who have to do just that for one reason or another. Maybe your teacher is making you… maybe you’re just interested in writing kanji. Whatever. I’m writing this guide for you so that you don’t have to spend a lot of time fussing around with stroke order. There are general rules and guidelines that you can follow to learn the stroke order of nearly any kanji out there, whether you’ve seen it before or not. If you learn these rules you won’t have to waste time thinking about which stroke comes next – that way you can focus on the more important things.
Kanji Stroke Order Rules
There are a set of general rules that you can learn to know the stroke order of 99% of all the kanji out there. Sure, there’ll be exceptions, but this is way better than learning the individual stroke orders of thousands of individual kanji.
Top To Bottom, Left To Right
This is a big one.When writing kanji, you always want to start your stroke on the left side of the line. If there is no left-side start position because it’s a vertical line, you’ll want to write from top to bottom. Whatever you end up writing, know that when you write any single stroke it should be written either left to right or top to bottom.
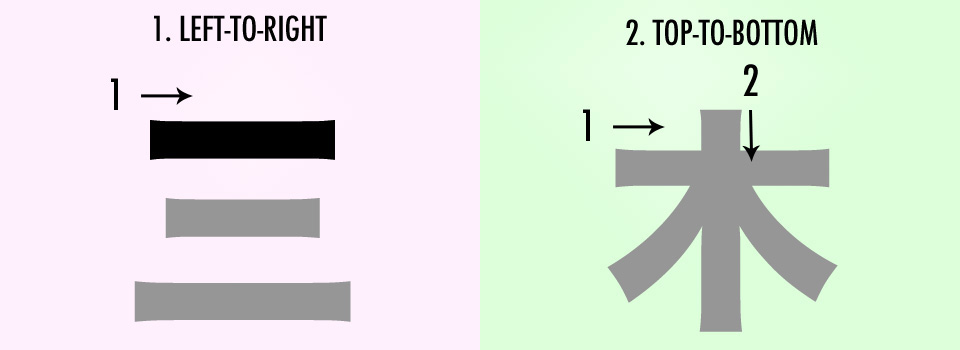
When you write horizontal strokes, they go left to right (see image one). When you write vertical strokes, you go top to bottom (see image two).
Horizontal Goes First
So now you know what direction to write all your strokes in, but what order do the strokes go in? Most of the time, you’ll want to do horizontal strokes first before doing the vertical ones.
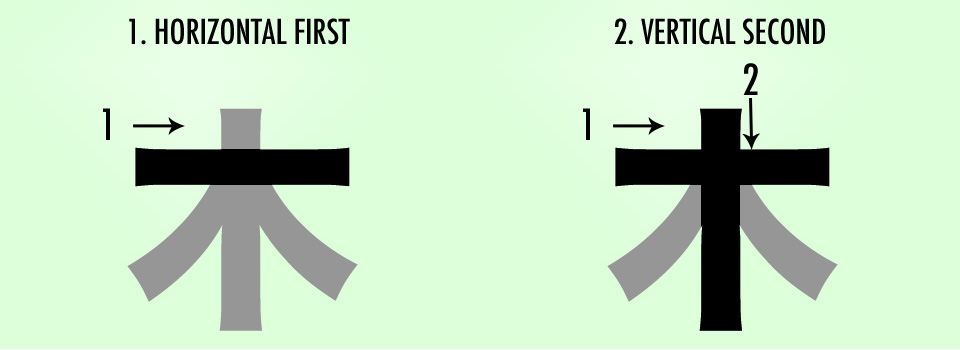
You’ll also want to start with the horizontal strokes that are closer to the top left first. Whenever you start writing a kanji, begin here. This is usually where your first stroke will reside.
Center Vertical Before Symmetrical Outside
The 木 character in the above section begs a question though. Why are you writing the vertical line second, and not the two diagonals? What a great question, esteemed reader. When there’s a vertical line with symmetrical characters on the outside of it, you do the vertical line first.
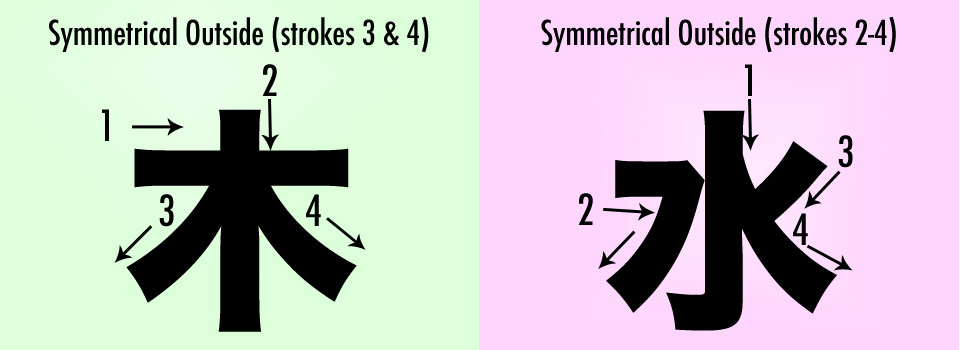
In both 木 (tree) and 水 (water) there are non-horizontal / non-vertical lines hugging both sides. Plus, they are symmetrical (or close enough, as is the case with 水). When this is the case, you’ll want to write the vertical stroke before the sides, though you’ll still want to write any horizontal strokes before the vertical one (as is the case in the example for 木).
Boxes Are Three Strokes
One really basic thing that you need to know is that boxes (aka the 口 kanji) are only three strokes. A lot of people make the mistake of writing these boxes using four strokes (one stroke for each side). It’s important to know the stroke order for a box since it affects other stroke-order related things as well.
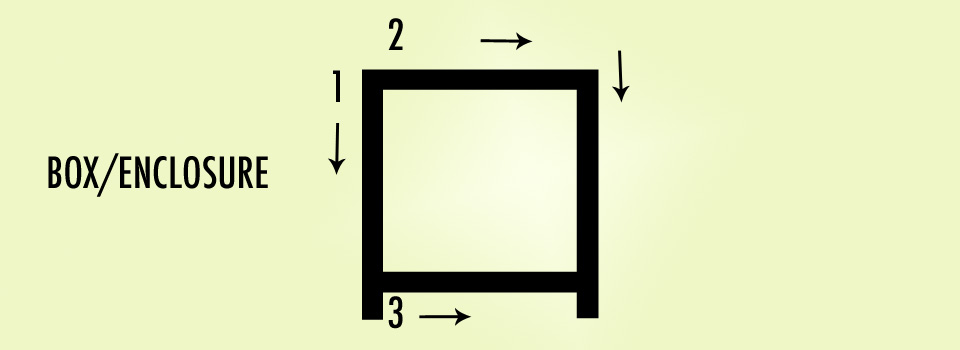
The strange thing about boxes is that they start with a vertical stroke instead of a horizontal one. The horizontal one is second, though it turns at a right angle to continue to the bottom (all in one stroke). Then, the last stroke is a horizontal stroke from the left (always from the left, remember!) to close out the box. Make sure you remember this, because the next rule requires this information!
Enclose Contents On Three Sides First
There are a lot of kanji that consist of big squares surrounding something. For example, 回, 園, 国, and so on. When you have a kanji like this that has an enclosure, really you can follow the same rules as you’ve been learning. The main thing, though, is that you do three sides of the enclosure first (that’s the first two strokes of the box/enclosure) and then do everything on the inside. When you’re finished with the inside, you can finish off the enclosure with a single horizontal stroke (that’s stroke three from the last section).
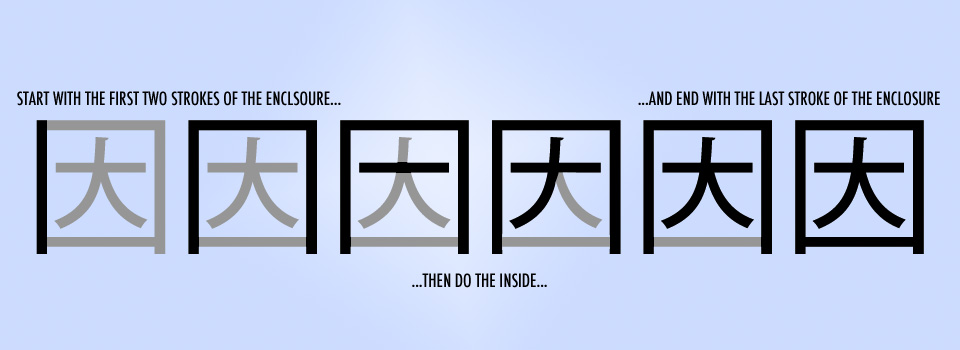
Whenever you see an enclosure like this, begin with the enclosure first. This even holds true for other types of enclosures, even ones that don’t close on the bottom. Examples of kanji like this include 同, 可, 月, 用, 病, and more. With these, you’d still do as much of the three sides of the enclosure that you can then follow that with the inside portions. When there’s not bottom horizontal stroke to close it off, just skip that part. By learning the pattern with the full enclosure (口), though, you should be able to do it with other types of enclosures as well.
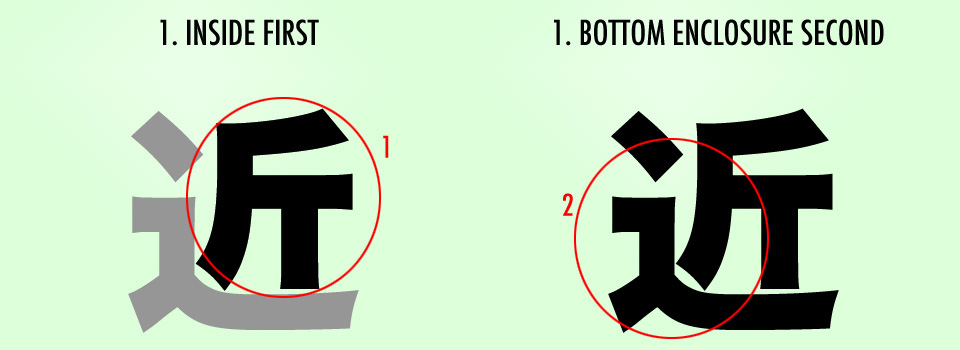
Bottom Enclosure Last
You just learned about topside enclosures, so what about bottom-side ones? I’m talking about the squiggly lines that you often see in the bottom left portion of kanji, for example 道, 近, and so on. These sections always come after the parts above them. As in, they come last.
There’s a couple of interpretations on stroke order for the bottom enclosure too. Some people do it with two strokes (the dash at the top, and then the rest all in one stroke) and some do it in three strokes (dash at the top, the more vertical line, and then the horizontalish one). The three-stroke version is probably more correct, but it’s a lot easier and faster to write it with two.
Right-To-Left Diagonals Before Left-To-Right Diagonals
In cases where you have diagonal strokes, you’ll want to do the right-to-left one first. This makes sense when the diagonals don’t cross (as is the case with 木), but when they do cross, things get a little tricky. Let’s look at the kanji 父 since it’s made up of four diagonal strokes, which covers both situations at once!
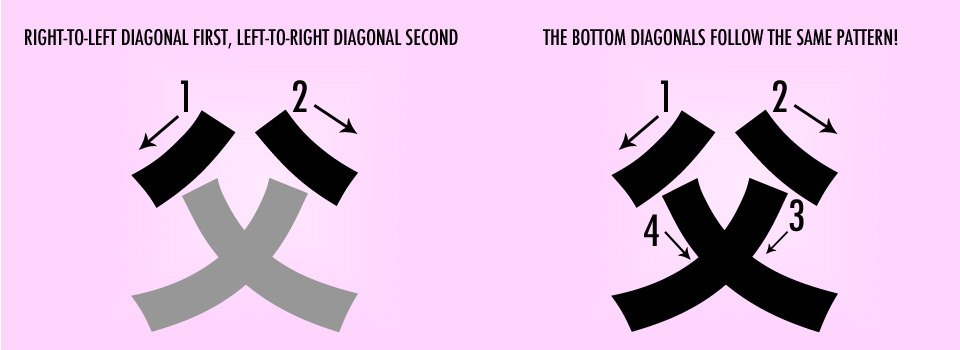
You should also note that even when there are two sets of diagonals, you start with the set that is near the top-left first (because this is where kanji usually starts to get written from). Then, the second set of diagonals are written after. When the right-to-left diagonal isn’t crossing a left-to-right diagonal, it follows the rules you’ve already learned so far. The exception that you have to remember is when the diagonals cross. The rule for diagonals remains the same, but you’re starting on the right side instead of the left, which may feel a bit strange. Still though, you’re ending in the bottom right (see stroke 4 in the image above), which is where you want to be ending.
Strokes That Cross Through A Lot Of Other Strokes Go Last
In some cases, there are kanji with a lot of horizontal strokes or a lot of vertical strokes, all in a line. When this is the case, you’ll want to do the stroke that crosses through all of these strokes last.
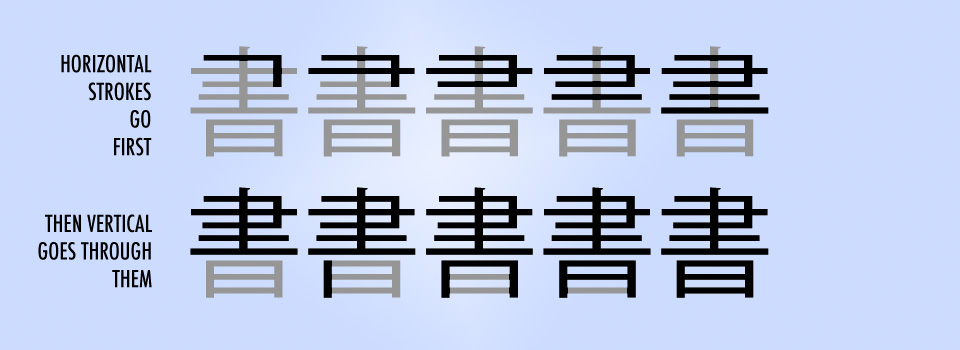
See how all the horizontal strokes go first? Then, when they are all finished, the vertical line can go through them after.
Dots/Dashes Are Saved For The End
When there are little dashes or dots, you can save those for the end.
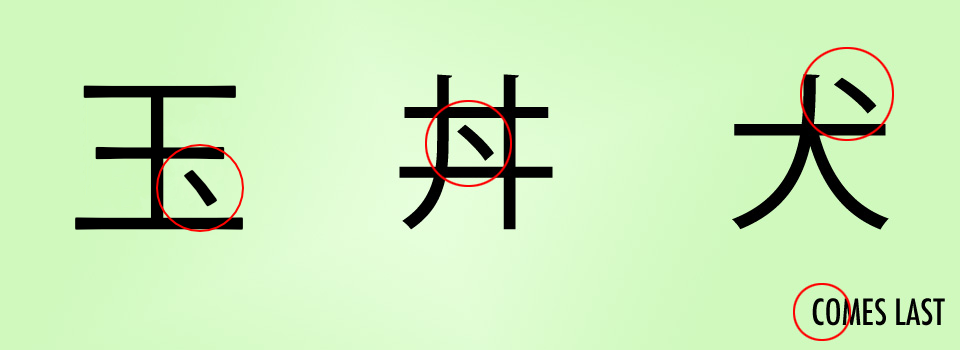
There are two exceptions to this. The first is when a kanji with a dot is used as a component within another kanji. The dot is the last stroke of that component, but that doesn't necessarily mean it is the last stroke of the entire kanji. In the case of 国, the dot is the last stroke of the 玉 portion, but following the rules above, the bottom of the enclosure is the last stroke of the entire kanji. The other exception is when the dot is at the very top. Then you want the dot to go first.
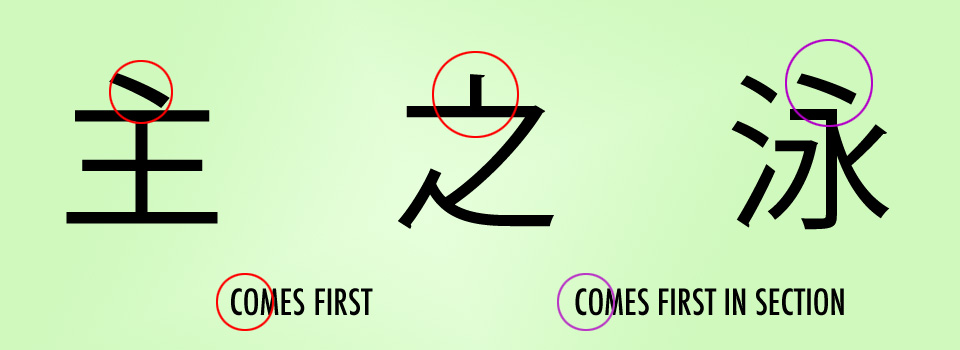
When the dash is at the top of a kanji and there’s nothing else equal to it in a horizontal plane, then usually that dash comes first, not last. This is also true for a section of kanji. Because you write kanji in sections (that’s the next area of this guide) you get to reset your rules at the beginning of each section. So, in the case of 泳, you’d write the left side first, then reset to start the right side, which starts with the dash at the top.
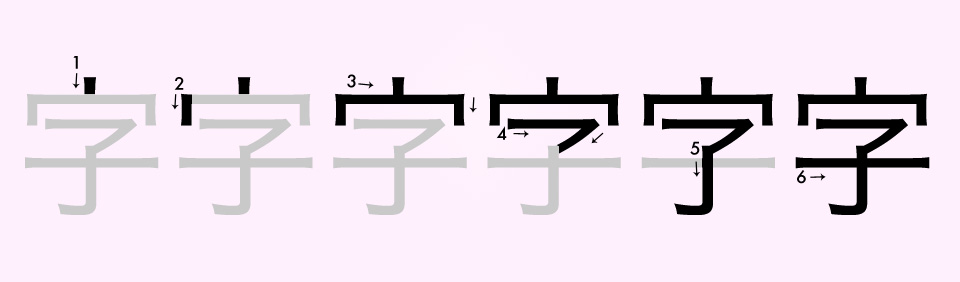
Write Kanji In Sections / Radicals
More complicated kanji are made up of multiple less-complicated kanji (or radicals,1 as I like to call them). When a complicated kanji has multiple radicals like this, you’ll want to write the kanji one radical at a time, starting (usually) from the top left radical working your way down to the bottom right. Each time you start to write a new radical, reset your writing rules just for that one section. Think of them as separate kanji you have to write, and then combine them together. Here’s an example of a more complicated kanji, and how you’d write it radical by radical. Note that there’s no stroke order here, I’m just showing you how to identify each individual section as well as which order to do them in.
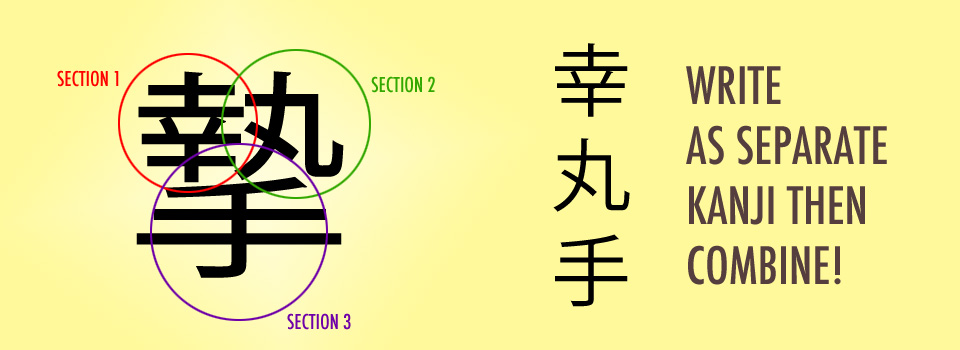
This means that if you use the rules from this guide to learn how to write smaller kanji you can usually figure out the stroke order for bigger kanji as well. Just make sure you do each section individually in a top-left to bottom-right sort of order and you’ll be A-Okay.
There Are Always Exceptions
…to everything. These rules will guide you most of the time, but sometimes things aren’t what they seem. Although doing the “wrong” stroke order by following these rules won’t get in you in much trouble, I think, you will have to learn these exceptions as exceptions if you want to learn and remember them.
Just know that they’re out there and look out for them when you can. Don’t stress out about it or anything, though. It’s not that big a deal unless you’re doing calligraphy or something like that.
Stroke Order Resource
If you need to look up the stroke order of a kanji, here is a website that will help you out.
Sometimes you won’t always be able to find a stroke order guide for the kanji you’re looking for though (especially if it’s a rare kanji). When this happens, you should just guess using the rules above. Also note that rare kanji also have strange stroke orders, so they may be exceptions anyways. Hopefully you don’t run into the need to write rare kanji in proper stroke order too often, though, so this isn’t something you ought to worry much about.
As you write more kanji and see this rules in action more often, writing in correct stroke order will become natural for you and you won’t even have to think about it. I hope this guide helps you to get to that point, and good luck in all your kanji writing endeavors!
-
The term “radical” is often used to translate the Japanese word 部首 (bushu). A kanji's bushu is the “main” component of a kanji, and it generally hints at the kanji’s meaning. Every kanji has just one bushu. However, we use the term “radical” to refer to all of the different components of a kanji, and not only the bushu. In other words, our use of the word “radical” is synonymous with “component”, “part”, or “primary.” ↩